
How to connect a surround sound system to your Roku TV™
Before you can enjoy your favorite streaming content in surround sound, you must connect your audio/video receiver (AVR) or soundbar to your Roku TV using an HDMI® cable or optical cable. This is a simple process, but its important to understand a few things before you begin. This article provides more details about each surround sound connection, and explains how you can get the best performance with your Roku TV.
Surround sound connections on your Roku TV
When you connect your AVR or soundbar to your Roku TV, the type of connection you choose mainly depends on the available hardware connections and features of your AVR or soundbar. Some older audio devices may be incompatible with newer HDMI technologies, or may be limited to older optical audio connections. Use the descriptions below to determine what type of connections are available on your surround sound system. All Roku TV models have a type of HDMI ARC connection and a digital audio output.
-
Digital audio output
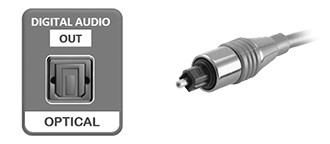
This connection is typically labeled "Digital audio out" or "Digital output", and is sometimes referred to as S/PDIF or optical. To make the connection, you will use an optical cable, sometimes called a TOSLINK cable.
- Note: When using an optical cable, be sure to remove the protective plastic cap from each end of the cable before inserting the connectors. Failing to do so may result in a faulty connection, or damage to the cable or optical port.
-
HDMI ARC

The HDMI ARC (or Audio Return Channel) connection is located among the other HDMI ports, and is often labeled "HDMI ARC" or just "ARC". When connecting your surround sound system using ARC, you will use an HDMI cable.
HDMI eARC (select Roku TV models only)

The HDMI eARC (or Enhanced Audio Return Channel) connection is located with the other HDMI ports, and is commonly labeled "HDMI eARC" or simply "eARC". To take advantage of eARC, you need to use a High Speed HDMI Cable with support for Ethernet.
- Note: HDMI eARC is only available on select Roku TV models.
If you are setting up a 4K Ultra HD or HDR device with your compatible Roku TV, you need to use a Premium High Speed HDMI Cable to get a 4K Ultra HD or HDR image when using ARC. For eARC, you need a Premium High Speed HDMI Cable with Ethernet, or an Ultra High Speed HDMI Cable (which does include Ethernet support).
If you are setting up an 8K Ultra HD or HDR device with your compatible Roku TV, you need to use an Ultra High Speed HDMI Cable to get an 8K Ultra HD or HDR image when using ARC or eARC.
Benefits of HDMI ARC
The HDMI ARC connection provides a number of benefits over the digital audio output, including those described below.
- Less clutter - With a single cable, HDMI ARC uses two-way communication to send sound to your AVR or soundbar, while simultaneously sending picture to your Roku TV. There is no need for separate audio and video cables.
- Control other devices - Using only your Roku TV remote, you can control aspects of your home theater like adjusting the volume and muting the sound.
- Support for more surround sound formats - The HDMI ARC connection supports the same formats as the digital audio output, but with greater throughput, it also supports advanced formats like Dolby Digital Plus™ and Dolby Atmos®. The S/PDIF connection is limited to 2 channels of uncompressed stereo sound (PCM), or 5.1 channels of compressed surround sound (Dolby Digital™ or DTS®).
HDMI eARC advancements
With significantly greater throughput, HDMI eARC offers support for advanced surround sound formats with higher audio quality. In addition to the formats S/PDIF and ARC support, the newer eARC connection adds support for full-resolution uncompressed audio formats like DTS-HD Master Audio™, DTS:X®, Dolby® TrueHD, and Dolby Atmos.
- Note: Dolby Atmos is supported on ARC, but only in a compressed format. HDMI eARC supports Dolby Atmos in a higher quality uncompressed format.
With faster data transfer and increased bandwidth, eARC also has built-in audio and video "lip-sync", which was an optional feature in the original ARC specification.
To take advantage of these advancements, both your Roku TV and AVR or soundbar must have an eARC connection. If one of your devices does not support eARC, you can still use HDMI ARC, but the device that supports eARC will not be able to use any of the enhanced features.
- Note: HDMI eARC is only available on select Roku TV models.
As mentioned above, you also need to make the connection using a High Speed HDMI Cable with support for Ethernet, like an Ultra High-Speed HDMI Cable.
What to check before using ARC or eARC
Before you connect your surround sound system using ARC or eARC, you should check to make sure HDMI ARC (or eARC) is enabled along with an HDMI feature called CEC (or Consumer Electronics Control). With CEC enabled, you can use your Roku TV remote to adjust the volume and mute the sound of your home theater, and display the volume level and mute status on the TV screen. You can find these settings on your Roku TV using the instructions below. If you need help finding the CEC and ARC settings on your AVR or soundbar, visit the manufacturer's online resources or contact them directly.
To enable ARC (or eARC):
- Press Home
 on your Roku TV remote
 - Scroll and select Settings
- Select System
- Select Control other devices (CEC)
- Scroll and highlight ARC (or eARC)
- Check the box using OK
 on your remote to enable ARC (or eARC)
To enable CEC:
- Perform ARC steps 1 through 4 above
- Scroll and highlight System audio control
- Check the box to enable System audio control
- Highlight 1-touch play
- Check the box to enable 1-touch play
If you want to learn more, refer to the detailed article about enabling CEC and ARC on your TV.
How to adjust surround sound settings on your Roku TV
You can configure various surround sound settings on your Roku TV in the S/PDIF and ARC menu using the instructions below.
- Press Home on your Roku TV remote
- Scroll and select Settings
- Select System
- Select Audio
- Select S/PDIF and ARC and make a selection
- Auto detect - This is the default setting that allows your Roku TV to automatically detect the capabilities of your surround sound system over the HDMI connection.
- Auto passthrough - Delivers unmodified Dolby Digital, Dolby Digital Plus, or DTS audio when available with the movie or TV show and when your Roku TV detects that your surround sound system supports the audio format.
- Note: The Auto passthrough setting allows an AVR or soundbar with appropriate capabilities to play content without any delay due to processing in the TV. When Auto passthrough is enabled, audio formats that are not supported by the AVR or soundbar may be converted to stereo sound (PCM) to keep any processing delay to a minimum.
- Specific audio formats - Choose one of the specific audio formats if the audio capabilities of your AVR or soundbar is not detected correctly, and you know it supports the specific audio format(s).