
How to set up your Roku Smart Light Strip SE or Roku Smart Light Strip+ SE
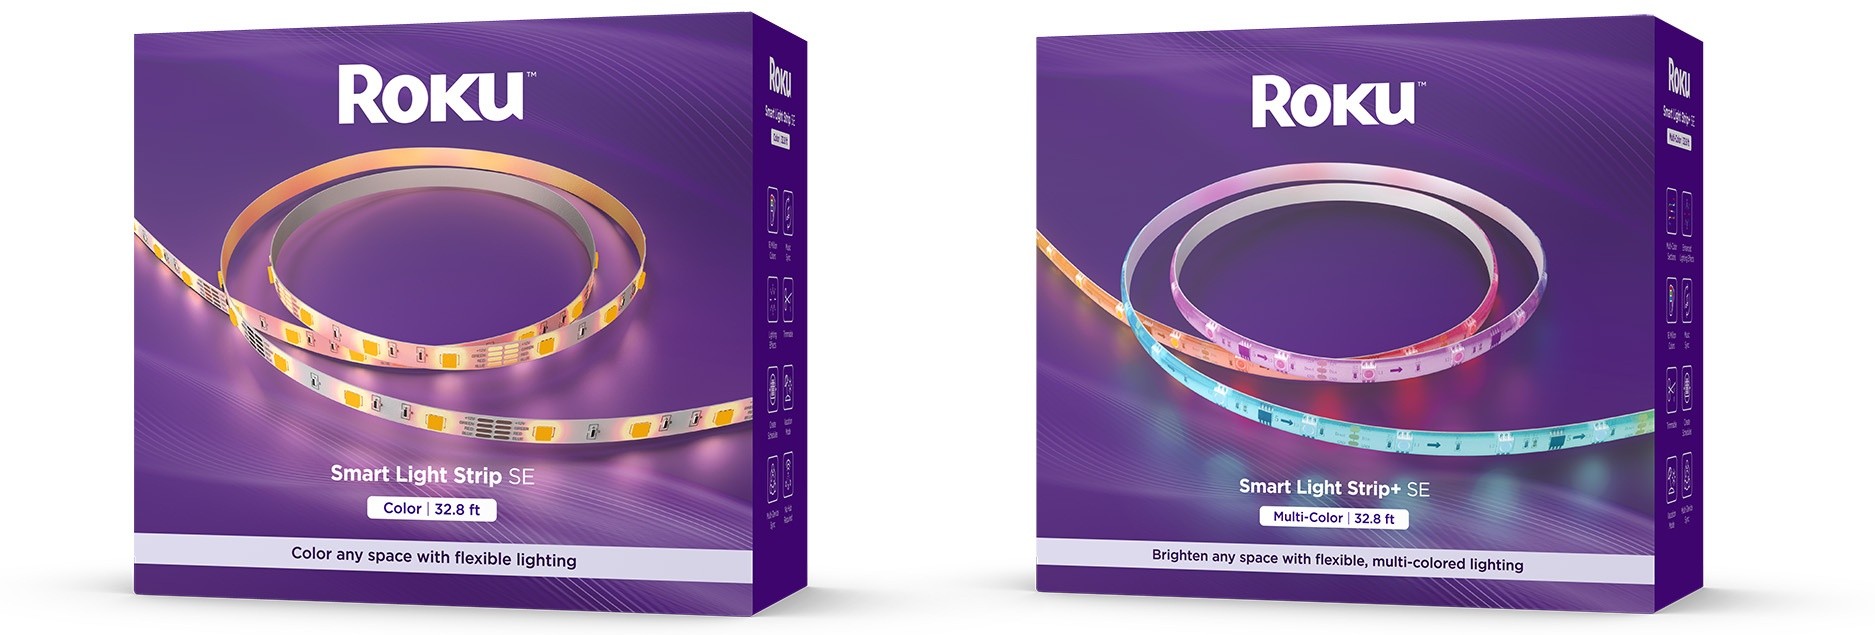
The Roku® Smart Light Strip SE and Roku Smart Light Strip+ SE both offer 16 million color options, adjustable temperature and brightness, sunlight match, vacation mode, and custom presets for any occasion. You can even sync your light strip to the beat of your favorite music or control it with your Alexa or Google Assistant. Roku smart light strips are available in two lengths – 16 feet and 32 feet. The Roku Smart Light Strip+ SE has 16 individually customizable sections, while the Roku Smart Light Strip SE can only have one color at a time.
Simply download and install the free Roku Smart Home mobile app and use it to connect your light strip to your wireless network.
Where to install your light strip
Your light strip can be installed anywhere in your home near a 12V power connection with many uses, including:
- Set the mood: Select just the right color to set the mood in any room.
- TV backlight: Light up the back of your TV for a real theater feel.
- Accent lighting: Add light under the kitchen cabinets or bring some color to those dreary office shelves.
- Dance studio: Use music sync mode to set your light strip to the beat of your favorite tunes.
What you need for setup
After you choose a location, you may need the following items when mounting your light strip and controller.
- Alcohol wipes: Clean the mounting surfaces with the included alcohol wipes and let dry when finished. Dust can reduce the strength of the adhesive on the back of the light strip and controller.
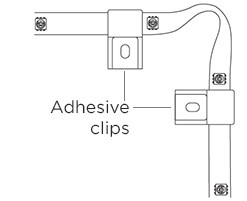
- Adhesive clips: Use the included adhesive clips to reinforce the controller cables and light strip, particularly around corners or anywhere the strip needs to bend.
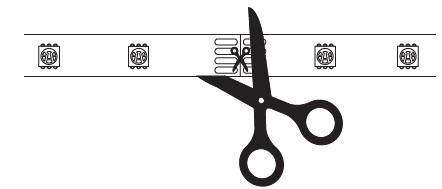
- Scissors (optional): If you need to shorten the length of your light strip, make sure it is disconnected from power and only cut at the designated marks as seen below. Any trimmed portion cannot be used and should be discarded.
When it's time to set up your light strip, you will need the following:
- Power: Your smart light strip requires a 12V power connection.
- Wi-Fi®: Your smart light strip needs a 2.4GHz wireless network connection with WPA/WPA2 security standard.
- Smartphone or tablet: You will need to download and install the Roku Smart Home mobile app for iOS® and Android™ to set up and control your light strip.
- Bluetooth®: Your smart light strip needs to connect to your mobile device with Bluetooth.
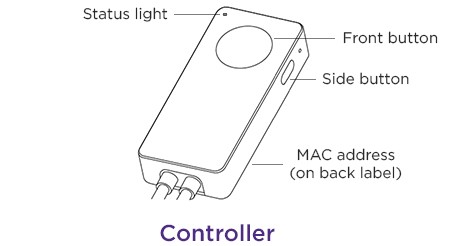
Before you begin, familiarize yourself with your light strip including the status light on the controller. It is also important to make note of the MAC address which is required should you need to contact Roku Customer Support.
Getting started
When you are ready, use the alcohol wipes to clean the surface where you plan to mount the light strip and controller. When the surface is dry, mount the controller where both the front and side buttons are easily accessible. If you have the 16-foot model, connect a single light strip to the controller. If you have the 32-foot model, connect two 16-foot light strips to the controller (not to each other). When connecting the light strips, do not force the connections. They are keyed to only fit one way. Use scissors if you need to trim the light strip and only cut at the designated marks.
- WARNING: Do NOT trim the light strip when it is connected to power.
As you unroll the light strip, peel off the adhesive backing and press it firmly into place as you go. Avoid bending the strip where an LED is located and use the adhesive clips for any corner bends.
You can view the tutorial video below, check out the Quick Start Guide for your model, or follow along with the remaining steps in this article.
 Quick Start Guide
- Roku Smart Light Strip SE Quick Start Guide (16 feet)
- Roku Smart Light Strip SE Quick Start Guide (32 feet)
- Roku Smart Light Strip+ SE Quick Start Guide (16 feet)
- Roku Smart Light Strip+ SE Quick Start Guide (32 feet)
What does the status light mean?
It is important to understand what the status light means as you power on your light strip and continue with the setup process.
| During setup | Status |
|---|---|
| Yellow and Blue - Solid | In pairing mode |
| Blue - Pulsing | Connecting to Wi-Fi |
| Blue - Solid | Light strip is on |
| No Light | Light strip is off |
| Yellow - Flashing | Device is offline |
Install the smart home app
The Roku Smart Home mobile app is a free application for iOS and Android that lets you set up, configure, and control your Roku home monitoring system, cameras, video doorbells, plugs, bulbs, and light strips. You can download the smart home app from the appropriate link below.

Connect your light strip
Before you get started, make sure your smartphone or tablet is connected to your 2.4GHz Wi-Fi network (e.g., MyNetwork_2.4GHz). Next, launch the smart home app and create a new Roku account, or enter the username and password for your existing account. After you sign in, perform the steps below to connect your light strip.- Add your light strip
- Tap the plus sign
 from the navigation bar and select Add device
 - Select Lights & power and choose Smart Light Strip or Smart Light Strip+
- To get help mounting your light strip, tap Begin Installation and follow the on-screen instructions
- Connect to Wi-Fi
- Your 2.4GHz wireless network should be listed in the Wi-Fi network name pull-down
- Learn how to identify and connect to your 2.4GHz network
- Enter your password and tap Next
- Pair your light strip
- Make sure your light strip is powered on and is pulsing blue to indicate it is in pairing mode. If it is not, press the side button on the controller until the status light flashes yellow and blue.
- When your light strip is detected, check the box and tap Next
- For help, learn what to check if you cannot connect your light strip.
- Finish setup
- Name your light strip and press Finish
With the Wi-Fi connection, you will be able to control your smart light strip remotely. If you are using your smart light strip without Wi-Fi, you can still turn it on and off manually by pressing the side button on the controller.
Using your Smart Light Strip
After you finish the setup process, familiarize yourself with the controller buttons and how they let you control your light strip.
| Front Button | Side Button |
|---|---|
| Single press: Power on and change color | Single press: Change mode |
| Long press: Power off | Long Press: Enter pairing mode |
When you want to learn more, check out other great features of your Roku Smart Light Strip SE or Roku Smart Light Strip+ SE.