
How to set up your Roku Touch™ tabletop remote
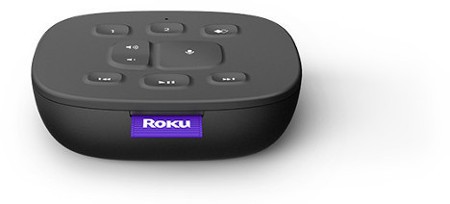
Your Roku Touch is a tabletop remote that lets you use voice commands or simple button presses to quickly begin listening to music, search for content, or control playback on your Roku® streaming player or Roku TV™. With no wires, the battery powered remote can be placed anywhere you can hear your Roku device. This article describes the product in more detail and outlines the setup steps.
Where to use your tabletop remote
Roku Touch is a simple remote designed to help you quickly control your Roku device when you are somewhere nearby, but not specifically sitting in your primary viewing location. Without all the same buttons you find on your handheld Roku remote, it is not intended to replace that remote, but instead work with it to improve your overall streaming experience.
Where you decide to use your Roku Touch will depend on the layout of your home and the room where the Roku device you plan to control is located. If you have an open floor plan, you may want to rest your Roku Touch on an entryway table so you can start playback of some relaxing music after a long day at the office. You may decide to set it on a desk and launch popular podcasts from afar when you are paying the monthly bills. If your kitchen is nearby, rest your Roku Touch on the counter for those times you need to pause the kids' show or turn down the volume when it is time for dinner. Or, set it next to the coffee maker and start listening to a radio news program while brewing a fresh pot each morning.
- Note: Your Roku Touch tabletop remote must be used within listening distance of your Roku device. The usable distance can be degraded by some building materials and the stability of your wireless network.
Pair your Roku Touch
To pair your Roku Touch, you must put it in pairing mode along with your Roku device. To begin, use the following steps to put your Roku player or Roku TV in pairing mode.
- Press Home
 on your handheld Roku remote
 - Scroll and select Settings
- Select Remotes & devices
- Select Pair new device
- Select Remote
When your Roku device is in pairing mode, an on-screen progress indicator tells you when it is searching for, and pairing with the remote. Use the steps below to put your Roku Touch into pairing mode and complete the pairing process.
- Remove the battery cover from the bottom of your tabletop remote and insert two new AAA batteries
- Press and hold the pairing button located in the battery compartment for 5 seconds, or until you see the light inside the compartment begin to flash. This pairing indicator will be accompanied by your tabletop remote telling you it is "searching for devices".
- After the remote pairs automatically, your Roku device will return to the Remotes & devices menu.
Now that your Roku Touch is paired with your Roku device, you should learn about the buttons that let you search and control your Roku device.

- Note: The diamond button
 on Roku Touch is reserved for future use.
Use voice commands
Using voice commands with your Roku Touch gives you quick access to your favorite music, live radio stations, popular podcasts, and more from Pandora, iHeartRadio, and TuneIn. If you have a Roku TV, you can even use voice commands to search and control your music when the TV screen is off.
For the best experience, Pandora and TuneIn require you create an account and log in to start listening to free or premium content. If you want to begin listening right away, iHeartRadio gives you access to free content without an account, but you will need to create one if you plan to subscribe to their premium services.
When you are ready, you can press and hold the Voice button  and speak naturally saying a command like, "listen to classical music on Pandora", "play Stuff You Should Know on iHeartRadio", or "play Today's Hits on TuneIn". Your Roku device will launch the specified channel and begin playing the music, radio station, or podcast audio. For more details about voice control of your music, and where you can find audio content, read the detailed articles below:
- How to listen to music with voice commands
- How to listen to music when the screen on your Roku TV is off
- Overview of different voice commands
Customize your personal shortcuts
You can program a personal shortcut button to perform an often-used voice command with a single press. To begin, press and hold the Voice button and say a voice command like "play classic rock". Next, wait for the command to be executed, and then press and hold the personal shortcut button until you hear the success tone come from your Roku Touch.
The personal shortcut button is now programmed to the last voice command you issued. Any time you press it, that voice command will be issued with a single touch.
- Note: You can reassign personal shortcut buttons as often as you like.
For more detailed instructions, read about how you can program a personal shortcut button on your Roku Touch tabletop remote.
Why are the volume buttons not working?
The volume buttons on your Roku Touch tabletop remote will control the volume on all Roku TV models, but when paired with a Roku player, the volume buttons may not work. This is because your Roku Touch cannot directly control devices that are connected to your Roku player, such as your TV (and its built-in speakers), an audio/video receiver (AVR), or soundbar.
However, your Roku player may be able to send volume commands to your TV, AVR, or soundbar using a technology called HDMI-CEC. In these cases, your Roku Touch remote can indirectly control volume for your TV, AVR, or soundbar. For this to work, all your devices must be connected via HDMI, and all devices must support HDMI-CEC and have this feature enabled. To learn if your TV, AVR or soundbar supports this technology, refer to the device's documentation.
- Note: Manufacturers may refer to HDMI-CEC by a different name, such as Sony BRAVIA Sync, LG SimpLink, and Samsung Anynet+. Other manufacturers like Hitachi and Vizio use the standard term HDMI-CEC or CEC.