
How to set up your Roku Streambar SE
Your Roku® Streambar® SE is the easy way to add 4K streaming and crisp, clear dialogue to any space you call home. It’s the ideal choice for bringing big-screen entertainment to smaller or older TVs. Everything you need is included in the box. Just plug it into your TV and connect to the internet. It’s that simple.
To get started setting up your Roku Streambar SE, you can read the Roku Streambar SE Quick Start Guide or follow the detailed instructions in the sections below.
Where to install your Roku Streambar SE
Whether you choose to simply place your Roku Streambar SE on a piece of furniture in front of your TV or use a universal mount, you can get the best audio experience by installing your Streambar following the guidelines below:
- Match the front edges: When placing your Streambar on a piece of furniture, the front edge should be flush with the front edge of any TV stand, shelf, or table. If it is set back too far from the front edge of the flat surface, sound will reflect.
- Align with your TV: Your Streambar should be centered with the TV screen to best anchor the sound to the picture.
- Avoid enclosing your Streambar: Avoid placing your Streambar inside a closed space like a cabinet or TV stand. If you have no better alternative, make sure the front edge of your Streambar is flush with the front edge of the shelf (inside the cabinet or TV stand).
- No obstructions: The area in front of your Streambar should be free of objects such as picture frames, ornaments, plants, etc. High frequencies like dialogue are affected more by these obstructions than low frequencies.
- Consider a universal mount: If you do not have an ideal location on a piece of furniture, consider mounting your Streambar with a universal mount.
How to connect your Roku Streambar SE
Your Roku Streambar SE will work with any television that has an available HDMI® port. However, to simplify connections, we recommend using a special type of HDMI port called an ARC (Audio Return Channel) port.
Smart TVs manufactured in 2009 and later typically have one ARC port labeled HDMI-ARC or ARC (among the other HDMI ports). If another device is already using the ARC port, consider moving that device to a different HDMI port – only one device can be connected to the ARC port.
If your TV does not have an ARC port, you will need to connect both the included HDMI cable and optical cable to your TV.
- Tip: Consult online documentation or the user manual for your TV if you need help finding your ARC port or optical port.
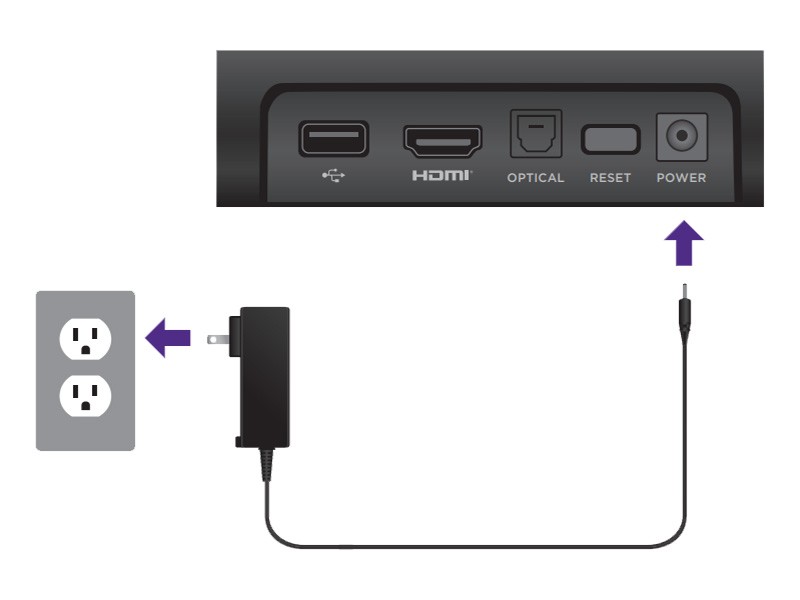
How to connect your Streambar to power
Use the included power adaptor to connect your Streambar to a wall outlet.
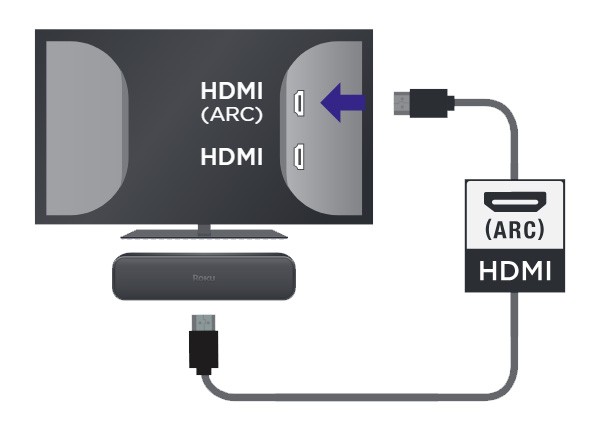
How to connect your Streambar to the ARC port
Use the included Premium High Speed HDMI Cable to connect your Streambar to the ARC port on your TV and then follow the steps in the next section to check the settings on your TV.
- Note: You do not need to connect an optical cable when using the ARC port. If you use both, the sound may be out of sync.
How to connect your Streambar to any other HDMI port
If you are not using an HDMI-ARC port, use the following instructions to connect your Streambar to your TV.
- Warning: Remove the protective plastic cap from each end of the optical cable before inserting the connectors. Failing to do so may result in a faulty connection, or damage to the cable or optical port.
- Use the included HDMI cable to connect your Streambar to any available HDMI port on your TV
- Connect one end of the included optical cable to the Optical port on your Streambar
- Connect the other end of the optical cable to the Digital Audio Output on your TV.
Once the HDMI cable and optical cable are connected, you're ready to continue with the on-screen setup and activation steps.
How to adjust your TV settings
There may be a few settings you need to change on your TV before you can get the best experience out of your Roku Streambar SE.
- Enable ARC on your TV. If your Streambar is connected to the ARC port, check your TV settings to make sure ARC is enabled. ARC may be disabled on your TV be default. If ARC is disabled, your Streambar will not play sounds from your TV or other devices connected to your TV.
- Enable CEC on your TV. HDMI-CEC (or just CEC) lets you you control basic functions, like power and volume, of different devices without having to juggle remotes. If CEC is disabled, you will not be able to use your Streambar remote to turn your TV on and off, or your TV remote to control volume on your Streambar.
- Change your TV audio output format to PCM. Your Streambar cannot play Dolby Audio or DTS audio formats. Make sure your TV audio output format is set to PCM-Stereo (or Stereo).
When you are looking for these settings on your TV, keep in mind that some manufacturers refer to ARC and CEC by their proper names, while others may use brand-specific trade names. Some manufacturers even combine ARC and CEC into a single setting.
- Tip: For help enabling ARC and CEC on your TV, review the detailed article describing how to enable ARC and CEC on several popular TV brands.
On-screen setup and activation
After the connections are made and your Streambar powers on, make sure the correct input is selected on your TV (the input to which your Streambar is connected). After a moment, you should see the Roku logo on your TV screen followed by an initial setup screen. If you do not see the logo, use your TV remote and double-check that the correct input is selected. Help is available if you do not see video on your TV.
The remaining portion of the setup process varies depending on the type of television your Streambar is connected to. If you have a Roku TV system, you may be able to complete the automatic setup process. Choose the appropriate link below to continue with on-screen setup and activation.
- Your Roku Streambar SE is connected to a Roku TV system
- Your Roku Streambar SE is connected to any other TV
- Note: If you are not sure what type of television you own, learn how to determine if you have a Roku TV system.