
How to set up your Roku Home Monitoring System SE
Your Roku® Home Monitoring System SE helps you protect what you love with entry and motion detection alarms. Monitor your home yourself for free or take it one step safer with 24/7 live Pro Monitoring powered by Noonlight (subscription required). With a guided, stress-free setup, you’ll have peace of mind in no time.
Roku Home Monitoring System SE is intended for private home monitoring only. Use of the home monitoring system may be subject to permit, license or registration requirements. Check your state laws regarding placement of monitoring systems in public spaces. Check your local and state laws regarding the use of professional monitoring services for private residences.
What you need for setup
Before you begin, familiarize yourself with your home monitoring system.
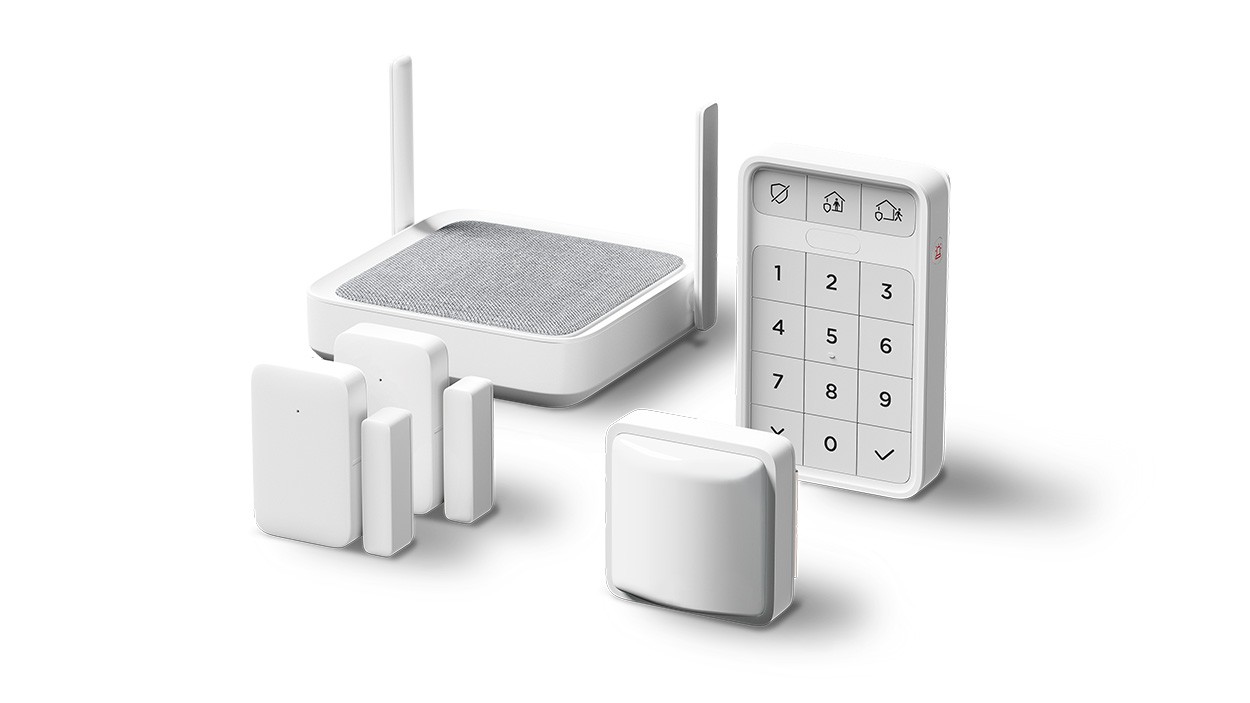
- Roku Monitoring Hub: Provides long-range coverage for all your sensors and features a built-in siren.
- Roku Entry Sensor (x2): Alerts when a door or window is opened, closed, or left open.
- Roku Motion Sensor: Detects motion, but ignores pets, up to 25 feet.
- Roku Keypad: Quickly turn your system on and off or manually trigger the alarm.
- Window decal (x2): Let everyone know you are monitoring your home with Roku.
In addition to your Roku Home Monitoring System SE and included accessories, you will need the following:
- Power: Your home monitoring system requires power via the included micro-USB cable and power adaptor.
- Wired network or Wi-Fi®: Use the included ethernet cable to connect the monitoring hub to your router* or to your home's 2.4 GHz Wi-Fi network.
- Smartphone or tablet: You will need to download and install the Roku Smart Home mobile app for iOS® and Android™ to set up and control your home monitoring system. Your smartphone or tablet must have an internet connection and Bluetooth® capability.
- Ladder or stepstool (optional): The best place for mounting your sensor may be outside of arm reach.
- Phillips screwdriver (optional): The keypad and smart sensors include adhesive mounts on the covers and also include screws and drywall anchors for surface mounting
Where to install your home monitoring system
Planning your home monitoring system layout before starting the setup process can save time and make the set up process even easier. Consider the following tips for mounting and placement of your monitoring system components
- Choose a central location for your monitoring hub. Your hub's siren sounds when an alarm is triggered. Choose a location where you can hear the siren throughout the house or in your most used rooms.
- Place your monitoring hub near a power outlet. Your hub has a built-in battery backup, but it still requires power for normal operation.
- Clean mounting surfaces. Clean the mounting surfaces with a mild soap and water and then dry. A clean mounting surface ensures the adhesive back on your keypad and sensors will stick.
- Mount your keypad near an entry door. Mount your keypad near your most commonly used entry or exit door, so you can turning your system on and off part of your normal routine.
- Mount your motion sensors high. Use the 25 feet range and 120° of detection to your advantage by mounting your motion sensor up to 7 feet high.
- Position your motion sensors towards a doorway. Aim the motion sensor where people are likely to walk by.
- Keep a clear path for your motion sensor. Your motion sensor will be most effective when it has a clear field of view and is not obstructed
- Avoid radiators, lamps, and vents. Heat sources can disrupt your motion sensor's motion detection zone.
When you are ready, download the Roku® Smart Home mobile app.


To learn more about your Roku Smart Home device before you begin, take a moment to review the helpful resources in this article.
What does the status light mean?
It is important to understand what the status lights mean as you power on your home monitoring system and continue with the setup process.
Monitoring hub status lights
Your home monitoring hub has three status lights on the top. Refer to the chart below to learn what the different lights can tell you about your hub.
| Light behavior | Status |
| Lights off | Powered off or has no power |
| Three rolling lights | Monitoring hub is booting |
| Three solid lights | Boot sequence complete |
| Lights flashing slowly | Ready to connect |
| Lights flashing fast | Connecting to Wi-Fi or Ethernet network |
Sensor status lights
Your entry sensors and motion sensor have a red LED status light. The light will blink once when the sensor is powered on and blink three times when the Reset button is pressed.Connect your home monitoring system
You can check out the Roku Home Monitoring System SE Quick Start Guide that was included with your system or follow the instructions below.Launch the smart home app and create a new Roku account, or enter the username and password for your existing account. After you sign in perform the following steps to set your home monitoring system.
Install devices
You must set up the monitoring hub first and then you can add your smart home accessories.
- In the navigation bar, tap Monitoring
- Tap Set up system
- Note: Bluetooth must be enabled on your smartphone or tablet during setup to complete the pairing process with your monitoring hub.
Once your smart hub is set up, you can add your smart accessories in any order, but you must add your keypad and at least one sensor before you can continue with the set up process. Follow the instructions in the app to mount and pair your home monitoring accessories.
Set up system
During this step, you will configure your Home and Away modes and set the entry and exit delay timers. Modes let you choose which sensors you want active at different times. Delay timers allow you to set how long it takes to turn on or off your system.
Your mode configuration and entry and exit delay settings can also be changed after the initial set up process is complete.
Get Pro Monitoring
You can do self-monitoring with your home monitoring system, but signing up for a Pro Monitoring service powered by Noonlight provides additional features including the following:
- 24/7 Professional monitoring powered by Noonlight: Round-the-clock agents contact you immediately when an alarm is triggered in your home and send assistance if you cannot respond.
- One-tap emergency assistance: A single tap in the Roku Smart Home mobile app contacts a live agent who will get help to your home as quickly as possible.
- Manual emergency buttons: For unexpected emergencies while your alarm mode is off, manually sound the alarm and request emergency assistance with the panic button on your keypad.
- Address mapping: Emergency services will have your exact home address which can expedite the response time.
Using your home monitoring system
After you finish the setup process, learn what the different status lights mean as you use your home monitoring system. Your entry sensor will blink every time it detects an open or close. Your motion sensor will not blink when it detects activity.
Refer to the chart below for the different status lights for your monitoring hub.
| Light behavior | Status |
| Three lights blinking together | Pairing with home monitoring accessory |
| Two lights alternating flashing | Connecting to a network |
| Three rolling lights | Firmware update in progress |
| Three solid lights | Connected and working |
When you want to learn more, check out some of the other great features your home monitoring system offers.
- How to turn your Roku Home Monitoring System alarm modes on and off
- How to configure Roku Home Monitoring System Notifications
- How to activate an alarm with the panic button
- What to do during an alarm on your Roku Home Monitoring System
- What are the different home monitoring modes?
- How to change your phone number
- How to change Your home monitoring PIN
- How to create a monitoring schedule with home monitoring rules
Advanced tips
Everything you need to use your Roku Home Monitoring System is included in the box, but these advanced tips offer more potential for your monitoring system.
- Connect your router to a battery backup. Your monitoring hub includes a built-in battery backup, but if your network goes offline during a power outage your system will still go offline. Get a backup Emergency Power Supply (EPS) or Uninterruptible Power Supply (UPS) to connect to your router to make sure your system stays online and functional during any potential outage.
- Use rules to automate your home. Only monitoring sensors can trigger alarm events such as the siren or escalation to Noonlight agents. But, you can use rules to automate other Roku Smart Home devices based on your sensors.
Troubleshooting your home monitoring system
If you experience issues with your home monitoring system, refer to the following articles.
- How to find the MAC address for your Roku Smart Home device
- Roku Smart Home device not connecting to the app
- Roku Smart Home device is unable to update software
- Roku Smart Home device setting change fails
- How to reduce number of unwanted Roku Smart Home notifications
- Roku Smart Home device is offline
*A note on terminology:
To access your network and ultimately the internet, you will typically connect to a device called a router but it may also be referred to as a wireless router, wireless access point, home gateway or cable modem. In some cases, your internet service provider (ISP) may have provided you with a single integrated device that includes a cable modem and a router, or you may have purchased a stand-alone router from a company such as Linksys, NETGEAR, ASUS, Belkin or D-Link. In this article, the term router is used as a generic term to refer to the network device that your Roku device must connect to access the internet. For more information refer to the documentation provided by your ISP or router manufacturer.