
How to factory reset your Roku Smart Home device
A factory reset disconnects your Roku® Smart Home device from Wi-Fi® and restores factory default settings. Performing a factory reset is necessary when reselling or returning your smart home device and can be helpful as a troubleshooting step. The method for each type of smart home device is different so be sure to use the appropriate steps below.
Unlinking a smart home device is the preferred way to remove a smart home device from your Roku account. After unlinking your smart home device, you can then perform a factory reset to restore the device to factory default settings and ensure all data is erased.
For help with other Roku products visit the appropriate article below:
- Roku streaming device: If you are returning or reselling a Roku TV™, Roku streaming player, Roku Streaming Stick®, or a Roku Streambar® or Streambar Pro, or need to restore factory settings to help with troubleshooting, review the instructions for factory resetting your Roku streaming device.
Roku wireless audio device: If you plan to return or resell your Roku wireless speakers, Roku wireless subwoofer, or Roku TV Wireless Soundbar, or need to get your device back to a state ready for initial setup for another reason, refer to the detailed article about factory resetting your Roku wireless audio device.
Roku voice remote: If you are replacing a lost or broken remote and need help getting your new remote to pair successfully, visit the detailed article about setting up your Roku voice remote. If you need troubleshooting help, learn how to fix a Roku voice remote that is not working.
Factory reset your smart home camera
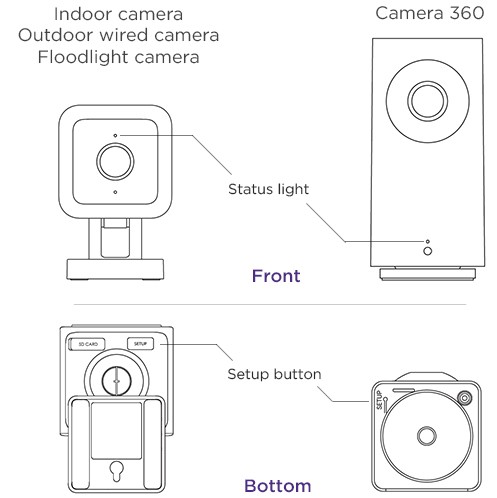
The first set of steps in this section apply to the following smart home cameras.
- Roku Indoor Camera SE
- Roku Indoor Camera 360° SE
- Roku Outdoor Wired Camera SE
- Roku Floodlight Camera SE
Before you begin, familiarize yourself with the location of the status light and the setup button. If you have a floodlight camera, you need to lift the camera from the motion sensor to access the setup button.
IMPORTANT: If a micro SD card is installed in your camera, remove it before performing a factory reset.
- Plug in your camera if not already powered on
- Press and hold the Setup button for 10 seconds
- Wait at least 30 seconds for your camera to restart
After a successful reset, you will see the status light on your camera flashing red. If you are troubleshooting and need to setup your camera again, refer to the following articles.
- Roku Indoor Camera SE setup instructions
- Roku Indoor Camera 360° SE setup instructions
- Roku Outdoor Wired Camera SE setup instructions
- Roku Floodlight Camera SE setup instructions
Roku Outdoor Camera SE
Unlike other Roku smart home cameras, the Roku Outdoor Camera SE cannot be factory reset for privacy and security reasons. However, you can restart it to help with troubleshooting. Simply open the weatherproof cover on back of the camera and slide the power switch off, wait a moment, and switch it back on. This procedure does not disconnect your camera from Wi-Fi or remove it from your Roku account.
If you need to factory reset the base station that is included with your outdoor camera, use the following steps.
- Plug in the base station if not already powered on
- Use a paperclip to press and hold the pinhole Reset button for 15 seconds until the status light turns solid yellow. The reset button is on the side of the base station where the USB port is located.
- Wait at least 90 seconds for your camera to restart
For a successful reset, check to see that the status light on top of the base station is flashing blue. If you need to connect the base station again, visit the Roku Outdoor Camera SE setup instructions.
Factory reset your video doorbell
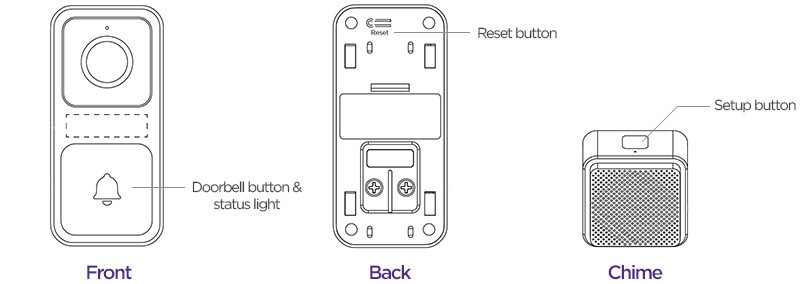
Roku Video Doorbell & Chime SE
Before you begin, take a moment to familiarize yourself with the layout of your video doorbell and chime.
When ready, follow the instructions below for your doorbell.
- Unmount your doorbell but leave it connected to power
- Press the Reset button
- Wait for your doorbell to restart
After a successful reset, you will hear "Ready to connect" and you will see the status light flashing yellow.
Use the next list of steps if you also need to factory reset your Chime SE.
- Plug in your chime if not already powered on
- Press and hold the Setup button for 5 seconds until you hear "Reset successfully"
If you need help connecting your video doorbell and chime again, visit the Roku Video Doorbell & Chime SE setup instructions.
Reset your Roku Home Monitoring System
The Roku Monitoring Hub is the center of your Roku Home Monitoring System. Use the instructions below to reset your Roku Monitoring Hub and remove all home monitoring accessories.
On the back of the hub, press and immediately release the Reset button and then unlink the hub in the Roku Smart Home mobile app.
Factory reset your light
Roku Smart Bulb SE
Use the instructions below to factory reset your smart bulb.
- Power on your bulb
- Turn the light switch off and on 3 times
If the reset was successful, your bulb will begin pulsing. If you need to connect it to the smart home mobile app again, refer to the Roku Smart Bulb SE setup instructions.
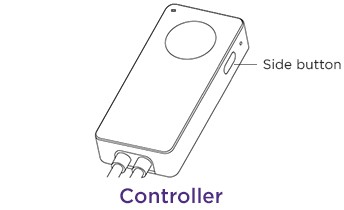
Roku Smart Light Strip SE and and Smart Light Strip+ SE
Before you start, take note of the button on the side of the controller included with your light strip.
- Connect your light strip to the controller and plug in the power adaptor
- Press and hold the side button for 10 seconds
Look for your light strip to pulse blue after a successful reset. For help connecting your light strip again, check out the Roku Smart Light Strip SE and Smart Light Strip+ SE setup instructions.
Factory reset your plug
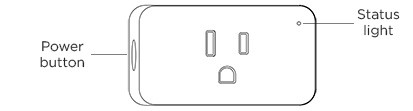
Roku Indoor Smart Plug SE
To help with the factory reset, familiarize yourself with the location of the power button and status light.
- Plug in your smart plug if not already powered on
- Press and hold the Power button until the status light begins to flash blue
If you need to connect your indoor plug again, visit the Roku Indoor Smart Plug SE setup instructions.
Roku Outdoor Smart Plug SE
Before you proceed, take note of the location of the power button and status light.
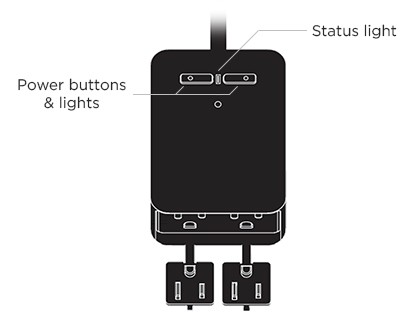
- Plug in your smart plug if not already powered on
- Press and hold one of the power buttons for 5 seconds
To confirm a successful factory reset, look to see if the status light is quickly flashing blue. If you need to connect your outdoor plug again, refer to the Roku Outdoor Smart Plug SE setup instructions.