
How to mount your Roku Smart Home camera
Mounting and installing your Roku® Smart Home camera is simple and easy. Proper mounting helps to ensure you can fully utilize features of your smart home camera such as night vision and event detection. Depending on the specific model, there are different ways to mount your smart home camera. The camera setup process in the Roku Smart Home mobile app will guide you through detailed installation and mounting steps. This article will provide helpful mounting tips and best practices for placement of your camera.
Mounting Tips
Correct placement and mounting is important to get the most out of your smart home camera. After following the guidelines below and mounting your Roku Smart Home camera, you can customize the notifications you receive by adjusting motion and sound settings.
General mounting tips
Consider the following tips when mounting your camera.
- Test the Wi-Fi® signal: Check the Wi-Fi signal with a mobile device at the location before mounting.
- Check the viewing angle: After you set up your camera, hold it in the desired location and test for an unobstructed view by accessing the live video stream in the app.
- Avoid placement behind a window: For optimal motion detection, do not mount your camera behind a glass surface such as a window or sliding door.
- Stay 3 inches away from other objects: If any objects like walls or light fixtures are too close to the sides or front of your camera, they can cause glare or hazy video, especially at night.
- Target side-to-side movement: The camera motion sensor is more sensitive to side-to-side movement across its field of view than to movement directly toward or away from the camera. The best area for motion detection is 5 to 20 feet from the camera position.
- Flip the image: If you choose a ceiling location or another spot where your camera is upside down, you can flip the image after setup is complete. Simply select your camera in the smart home app and go to Settings
 > Advanced Settings > Rotate Image 180°.
Outdoor mounting tips
There are additional considerations to take when mounting your camera outside of the home. If your outdoor camera is wireless, proper placement can improve battery life by reducing camera waking.
- Avoid direct sunlight: Facing the camera at direct sunlight can shorten the life of the image sensor on your camera leading to poor image quality.
- Focus away from heavy-traffic areas: Reduce unnecessary motion alerts and extend battery life by choosing a viewing angle that points away from unintended heavy-traffic areas such as a street or busy walkway.
- Avoid passive moving plants and objects: Position your camera away from objects that move passively such as branches that blow in the wind or a clothesline.
- Choose an elevated location: Mount your camera at least 7 feet above the ground to better detect people and reduce alerts from vehicles and other movement in the distance.
- Tilt the camera down slightly: The area where you want to record and detect motion should be in the bottom 2/3 of the image.
Mounting options
Mounting is optional for all Roku Smart Home cameras except the Roku Floodlight Camera SE. Refer to the chart below to see what mounting options are available for your specific camera.
| Screw mount | Adhesive magnet mount | Threaded mount | |
|---|---|---|---|
| Roku Indoor Camera SE | Yes | Yes | Yes |
| Roku Indoor Camera 360° SE | No | No | Yes |
| Roku Outdoor Camera SE | Yes | No | Yes |
| Roku Outdoor Wired Camera SE | Yes | Yes | Yes |
Screw mount
Cameras that support screw mounting include the proper mounting hardware, but not a Phillips screwdriver which is required. To assist when hand tightening the screwdriver, you may want to drill a pilot hole slightly smaller in diameter than the screw. If you are mounting to brick, stone, or drywall without a stud, use a drill and create a pilot hole before inserting the included plastic anchor.
Adhesive magnet mount
Cameras that support adhesive magnet mounting include a metal plate and adhesive backing. Make sure the mounting surface and metal plate are clean and free of dirt and debris before applying the adhesive backing.
Threaded mount
If your camera supports threaded mounting, it has a standard 1/4"-20 mounting thread. Tripods and speaker stands with 1/4"-20 threaded studs can be used as mounts.
Mount your Roku Indoor Camera SE
Your Roku Indoor Camera can be mounted to a wall or ceiling with the provided screw, adhesive magnetic plate, or standard 1/4"-20 mounting thread. The camera base is magnetic allowing it to be mounted to iron or steel surfaces. Use a screwdriver to remove the bolt that hides access to the mounting threads used to attach the base to the camera.
See our article with additional set up instructions for your Roku Indoor Camera SE.
Mount your Roku Indoor Camera 360° SE
A Roku Indoor Camera 360° SE is typically installed on a flat surface near a wall outlet or USB port (for power). Should you want to mount it, there is a standard 1/4"-20 mounting thread on the bottom of the camera.
See our article with additional set up instructions for your Roku Indoor Camera 360° SE.
Mount your Roku Outdoor Camera SE
Your Roku Outdoor Camera SE can be mounted to a wall or ceiling with the provided screw or a standard 1/4"-20 mounting thread. The camera must be positioned within range of the base station and the camera lens and sensor must be upright for features like person detection and motion detection to work properly. Both the top and bottom of the camera can attach to the magnetic base. You can access the mounting thread on the camera by pulling off the magnetic base.
In optimal conditions, the maximum distance between the camera and base station is 300 feet. If you have multiple walls, doors, and other structures between each device, the range may be reduced. After mounting the camera, use the app to check signal strength.
- Open the Roku Smart home app
- Tap Home
 from the navigation bar
 - Select the base station
- Locate the camera and check the three bars
 to see signal quality
If the signal is low, your camera may experience reduced battery life and require more frequent charging. To increase the signal, move the base station or choose an alternative location for your camera. If the base station is connected to Wi-Fi, it should be no closer than four feet to the Wi-Fi router.
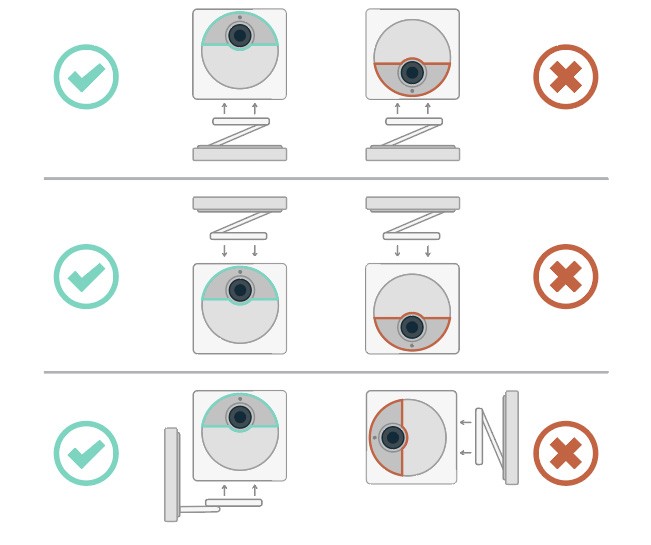
Whichever way you decide to mount your camera, the camera lens must be upright and the Sync button facing down. Your camera has a removable magnetic base, so pulling it off will not break your camera. Refer to the diagram below for the correct orientation.
See our article with additional set up instructions for your Roku Outdoor Camera SE.
Mount your Roku Outdoor Wired Camera SE
Your Roku Outdoor Wired Camera SE can be mounted to a wall or ceiling with the provided screw, adhesive magnetic plate, or standard 1/4"-20 mounting thread. The camera base is magnetic allowing it to be mounted to iron or steel surfaces. Use a screwdriver to remove the bolt that hides access to the mounting threads used to attach the base to the camera.
See our article with additional set up instructions for your Roku Outdoor Wired Camera SE.
Mount your Roku Floodlight Camera SE
Your Roku Floodlight Camera SE must be installed in a junction box that is either constructed of metal or has a ground wire for proper electrically grounded. If you need help, consult a licensed electrician. If you plan to install it yourself, check local regulations to make sure floodlight self-installation is legal.
We recommend the mounting location be roughly 10 feet above the ground where motion can be detected up to 30 feet away. The camera field of view is 130° and the motion area for triggering alerts is 270°. Before mounting, ensure this field of view is not be obstructed.
See our article with additional set up instructions for your Roku Floodlight Camera SE.