
How to set up your Roku Indoor Camera SE
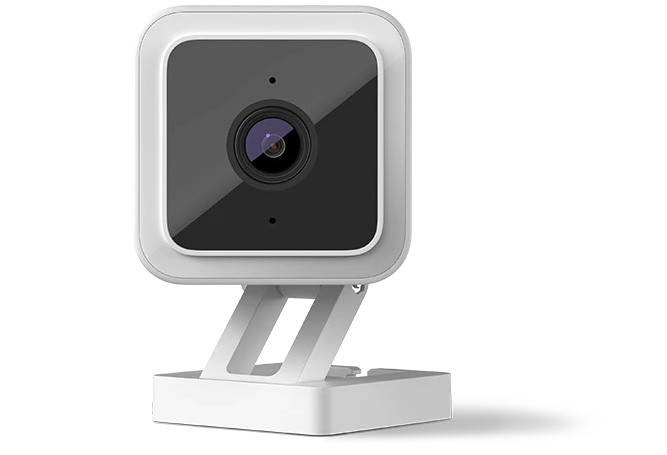
Your Roku® Indoor Camera SE delivers a Full HD image with great features like motion and sound detection, color night vision, instant notifications, simultaneous two-way audio, and an intruder siren. Plus, if you purchase a Roku Smart Home Subscription, you also get secure cloud storage, intelligent person, pet, and object detection, and instant recordings when motion and sound is detected.
Your camera includes everything you need to get started including a USB cable, power adaptor, and mounting hardware. Simply download and install the free Roku Smart Home mobile app and use it to connect your camera to your wireless network. You will be viewing the live video stream, receiving alerts, and personalizing settings in no time.
What you need for setup
In addition to your Roku Indoor Camera SE and included accessories, you will need the following:
- Power: If there is no wall outlet near the camera location, you may want to use a power extension cable (not included). You can also connect your camera to an available USB port on a computer or another nearby device that provides 5V/1A.
- Wi-Fi®: Your camera needs a 2.4GHz wireless network connection with WPA/WPA2security standard.
- Smartphone or tablet: You will need to download and install the Roku Smart Home app on your iOS® or Android™ mobile device to set up and control your camera.
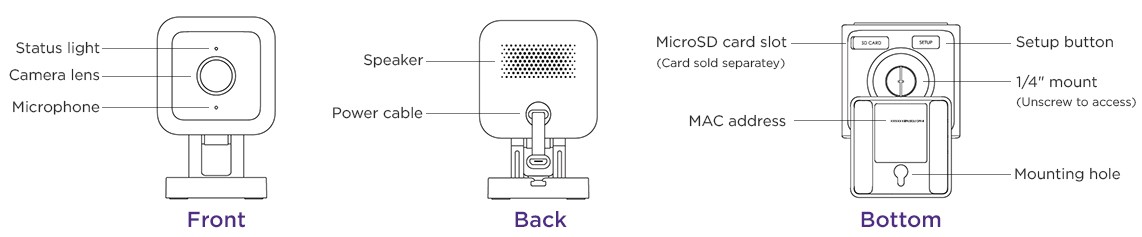
Before you begin, familiarize yourself with your camera including the location of the status light. It is also important to make note of the MAC address which is required should you need to contact Roku Customer Support. When it's time to access the setup button, gently pull the base away from the bottom of your camera.
Where to install your camera
Your camera can be installed just about anywhere in your home with many uses, including:
- Security cam: Set your camera to record video any time motion or sound is detected
- Baby monitor: Open the live video stream and look in on your little one at any time
- Pet cam: Keep an eye on your furry friends while you are at the office
After you decide how you want to use your camera, be sure to choose a location near a wall outlet or a device with an available USB port and place it on a flat surface or mount it in an unobstructed location. For help attaching it to the wall or ceiling, check out some mounting tips for Roku Smart Home cameras.
- Tip: If you choose a ceiling location or another spot where your camera is upside down, you can flip the image after setup is complete. Simply select your camera in the smart home app and go to Settings
 > Advanced settings > Rotate image 180°.
Getting started
When you are ready, power on your camera. First, attach the small end of the USB cable to the power cable on your camera making sure not to force the connection. The connector is keyed to only attach one way. Next, attach the other end of the USB cable to a wall outlet using the included power adaptor, or connect it directly to an available USB port on a computer or another nearby device that provides 5V/1A.
You can view the tutorial video below, check out the Quick Start Guide, or continue reading the remaining steps in this article.
- Quick Start Guide
 Roku Indoor Camera SE (model CS1000)
What does the status light mean?
It is important to understand what the status light means as you power on your camera and continue with the setup process.
| During setup | Status |
|---|---|
| RED - Solid | Powered on and beginning setup |
| RED - Flashing | Ready to connect |
| RED and BLUE - Flashing | Connecting to Wi-Fi |
| BLUE - Flashing | Connected and finishing setup |
Install the smart home app
The Roku Smart Home mobile app is a free application for iOS and Android that lets you set up, configure, and control your Roku home monitoring system, cameras, video doorbells, plugs, bulbs, and light strips. You can download the smart home app from the appropriate link below.

Connect your camera
Before you get started, make sure your smartphone or tablet is connected to your 2.4GHz Wi-Fi network (e.g., MyNetwork_2.4GHz).Next, launch the smart home app and create a new Roku account, or enter the username and password for your existing account. After you sign in, perform the steps below to connect your camera.
- Add your camera
- Tap the plus sign
 from the navigation bar and select Add Device
 - Select Cameras & doorbells and choose Indoor Camera
- Make sure your camera is powered on and the status light is flashing red, and then tap Next
- Press the Setup button on the bottom of your camera and listen for "Ready to connect". When you hear the phrase, check the box and tap Next.
- Tap the plus sign
- Connect to Wi-Fi
- Your 2.4GHz wireless network should be listed in the Wi-Fi network name pull-down
- Learn how to identify and connect to your 2.4GHz network
- Enter your password and tap Next
- Scan QR code
- Hold your camera about 5 inches from the QR code and listen for "QR code scanned. Please wait.". When you hear the phrase, check the box and tap Next.
- Learn what to try if your camera cannot scan the QR code
- Finish setup
- After you hear “Setup completed”, the status light turns solid blue and your camera is ready to use
- Name your camera and press Finish
With the Wi-Fi connection, your camera can record videos to the cloud with your Roku Smart Home Subscription. You also get instant recordings when motion and sound is detected, and intelligent person, pet, and object detection. Learn more about the premiere features available with your Roku Smart Home Subscription.
If your camera is installed where there is no Wi-Fi connection or the signal is poor, you can install a MicroSD card to record videos.
Using your camera
After you finish the setup process, be aware what the status light means as you learn to use your camera.
| After setup | Status |
|---|---|
| BLUE - Solid | Connected and working |
| RED - Solid | Viewing live stream or recording in progress |
| RED - Quickly flashing | Siren in use |
And when you are ready to learn even more, check out some of the other great features your Roku Indoor Camera SE offers.